
What Is the 403 Forbidden Error?
“403 Forbidden Error” an error you may encounter when you attempt for permission to Googlebot for crawling your website. This error indicates that Googlebot can’t access your site’s content because of a robot exclusion protocol. This is an arrangement of rules you can implement to stop certain kinds Web crawlers from accessing your website.
For more friendly terms”403 Forbidden Error” indicates that your server on your website tells Googlebot that it doesn’t have the permission to access the site or other resource you’re trying browse.
What Causes the 403 Forbidden Error on WordPress?
There are many possible causes of this error 403 forbidden that appears on WordPress. Here are some of the most commonly reported:
- Incorrect permissions for files: If your WordPress website is located on an Linux server the file permissions play an important role in the way your website functions. Unauthorized file permissions could cause an error message such as “Blocked due to access Forbidden (403)” error.
- Errorful .htaccess document: The .htaccess file is an essential component that is part of the WordPress installation. It is responsible for many crucial aspects of the way your WordPress site operates. A damaged .htaccess file could trigger the error code 403 Forbidden.
- WordPress plugins Sometimes the plugin could result in the error 403 Forbidden. This usually happens due to the fact that the theme or plugin isn’t compatible with the most recent versions of WordPress.
- WordPress themes As with plugins themes for WordPress theme may also trigger the error 403 Forbidden. It is typically because the theme isn’t compatible with the most recent versions of WordPress.
- Accessing WordPress through an IP address that is banned: If the IP address of Googlebot is banned, and Googlebot is blocked on your WordPress site, you’ll be able to see the error code 403 Forbidden.
- Security plugins Security plugins could cause the error 403 Forbidden in certain instances. It is typically due to the plugin restricting the access of your WordPress website due to a reason.
403 Forbidden Error Variations

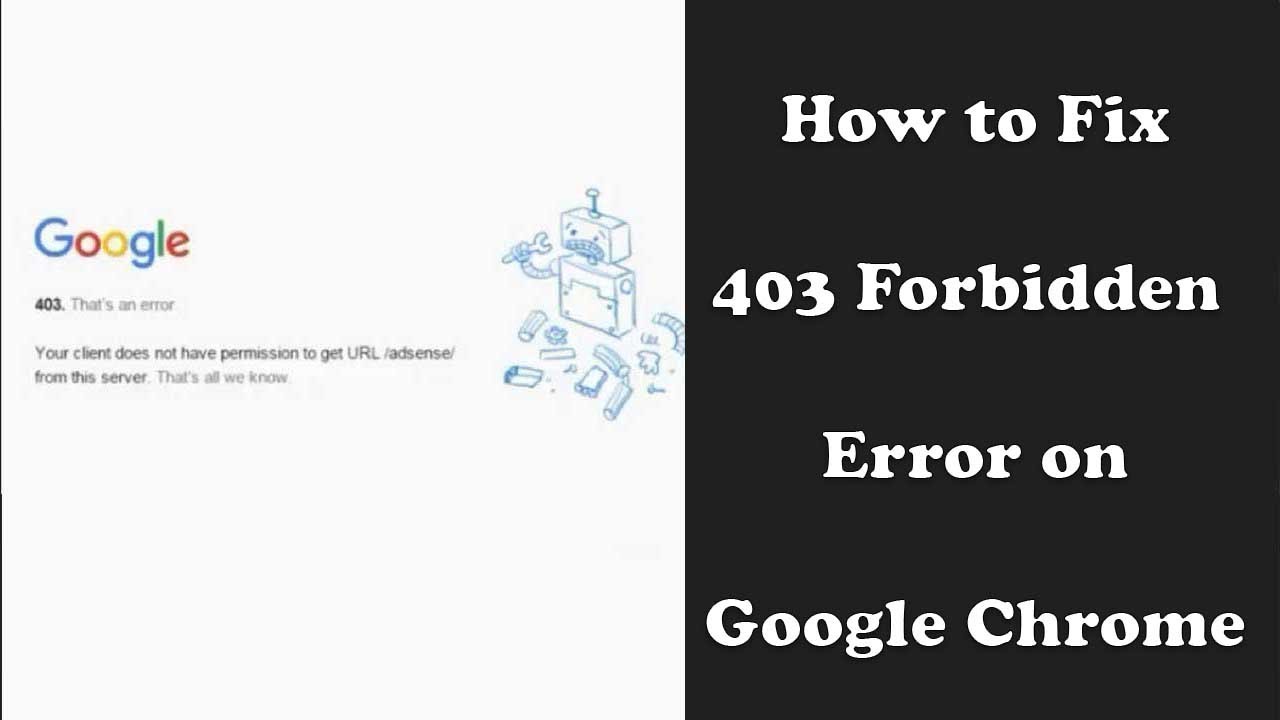
The error 403 Forbidden can be seen in many different ways. The most popular error is “403 Forbidden” error, as you can see in the image below.
Other versions of the error 403 comprise:
- You are not allowed to access the server. access to the server.
- 403 – Forbidden – Access is denied.
- HTTP Error 403: Forbidden You don’t have the right to access the file or program you wanted to access.
- Error 403 – Forbidden
- 403 Forbidden – NGINX
- 403 Forbidden Error You aren’t allowed to access this site.
- 403 Forbidden – Access this server is blocked.
- 403. This is a problem. Your client doesn’t have permission to obtain URLs or other information from this server.
- You aren’t legally authorized to access this page.
- It appears that you aren’t authorized to access this page.
If you’re still getting this 403 Forbidden error on your WordPress site, it’s a good bet to be one of the problems is the reason. Fortunately that all of these issues are same and are easy to correct. In the next part we’ll take you through each fix in greater detail.
Before we proceed we should look at the way to pinpoint the issue.
How to Find “Blocked Due to Access Forbidden (403)” Error?
Fortunately you can find you’re lucky because the “Blocked due to Access Forbidden (403)” error is easy to identify. It is possible to make use of to use the Google search engine or Index Status report in Rank Math’s Analytics to locate the error.
How to Fix the 403 Forbidden Error
Because this HTTP 403 prohibited error may be tied to permissions to access files This will be the main goal of the next steps to fix the issue. However, there are many other options to resolve this issue, like clearing the cache of your browser or analyzing for malware.
Let’s take a closer review of each available ways to fix this HTTP Error 403.
It is important to note that even though the methods described here mostly concentrate on WordPress but they could apply to different sites too.
1. Check the .Htaccess File
It is possible that you are not aware of the .htaccess file because it usually is hidden within the directory of your site. If you’re using hostinger’s File Manager the file is accessible within Your web_html publicdirectory as a default.
Use these methods to find it:
- Locate your the File Manager within the cPanel dashboard.
- Navigate to your the public_htmldirectory to locate it. .htaccess file.
If you are using cPanel take these steps:
- Locate File Manager on cPanel.
- Within the public_html directory search for . htaccessfile.
- If you are unable to locate the file, you can’t find it.file then click Optionson the upper-right corner of the screen. Then, activate to enable the Display Hidden Files (dotfiles) option.
It is the . htaccess file is an Apache server configuration file that is used to alter it’s Apache Web Server settings.
While the file is available on the majority of websites by default, you must create the fresh .htaccess document by hand if the site isn’t using it or it was accidentally deleted.
Once you have located the file, you can follow these steps to see if an incorrect configuration is the reason for the error:
- Right-click on the file , and choose the option to download to make backup.
- After you have created a backup of the file erase this file.
- Try connecting to your website. If it is working this means that the file is corrupted.
- To create a fresh .htaccess file, sign in into your WordPress account and then click Settings > Permalinks.
- If you do not make any changes, simply click to save the changes.the save changes button near the at the bottom on the screen.
This will generate a new .htaccess document for your site. If this doesn’t resolve the problem Try the next approach.
2. Reset File and Directory Permissions
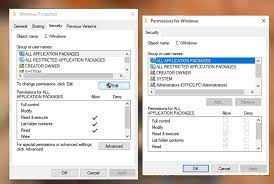
Another cause that can trigger HTTP 403 errors is the incorrect permissions granted to folders or files. When the files were created they are provided with specific default permissions for files that control the way you are able to access, read and run the files.
Pro Tip
If Hostinger is your choice Hostinger you can use a particular tool that can take charge of all permission issues with one click. You can type Fix Ownership of Files within the Search box or scroll down to the lower part of your control panel and click other and then locate it.
This tool can make your life easier and restore all directory and file permissions back to default values.
Utilizing FTP allows you to edit permissions for folders and files. For starters, you need to:
- Set up the FTP Client that you can connect to your site.
- After connecting Once connected, select the right-click the public_html icon and then select file attributes..
- Input authorization 755 in the Numeric value field, then select Only apply to directories and click “OK”..
The most common procedure for calculating the numeric value of permissions to files values is to use 755 as a folder, 644 to represent static content 700 when it comes to dynamic files.
- After changing permissions for folders After changing permissions for a folder, repeat the steps twoand step 3. however, add the number 644 within the numerical Value field and choose the Apply to only files option.
Once you have done that, go to your site and check if the issue has been resolved.
3. Disable WordPress Plugins

If you’ve come this far , and none of the methods previously tried do the trick, it is likely that the issue is due to an unsuitable or defective plugin. In this case we’ll attempt to disable plugins and see if this solves the 403 error.
We suggest disabling all plugins simultaneously instead of doing the process one at a time. If you follow this approach is the best way to identify the issue and then work on an answer. What you’ll need to accomplish:
- Connect to your hosting account using FTP or the file manager of your hosting account and navigate to public_html> WP-contentfolder.
- Find your plug-insfolder.
- Change the name of the folder to another name such as ” disabled-plugins” to deactivate all plugins.
Try accessing the site again. If the error message is no anymore present, then a malfunctioning plugin may be the real cause of the error.
Change the name of the folder and change it to the plugin folder. You must now remove the plugins one at a time one on your WordPress dashboard and verify that the website is working. This way, you’ll be able to identify the plugin that is not working properly.
If you spot the issue, either update the plugin if required or remove it. If you are still experiencing issues then you might need to get in touch with your hosting provider to get assistance.
4. Upload an Index Page
Find the homepage of your website It should be index.html or index.php. If it’s not, there are two options. The first, and the simplest option is to change the name of the homepage with index.html or index.php.
If you wish to keep your existing name for your homepage, simply upload an index page into the webmaster_svc directory and add an url redirecting to your existing homepage.
These are steps you should be followed:
- Download your index.html or index.php file to your public_html directory. Make use of your hosting account’s the file manager, or FTP to do this.
- Access and open the .htaccess file.
- Use this code snippet to redirect to the index.php or index.html Add the file to your page. Make sure to add a newhomepage.htmlwith the actual page’s name.
Redirect /index.html /homepage.html
5. Edit File Ownership
Incorrect ownership of a file can cause the forbidden error 403 If you’re using Linux as well as VPS Web Hosting.
Typically, folders and files are allocated to the Owner group, an Owner Group or both. Be aware that you require SSH access to alter the ownership of these types of environments. Also, you’ll need the SSH terminal that can access the server.
- After you’ve successfully connected SSH with the site server Check the owner using the following SSH command:
Ls -1 [filenamefile name
The end result will look like this:
* [owner][group20 Jul 20 at 12:00 filename.txt
- Examine the owner’s and group’s part. The correct ownership is the username of your hosting account. If you notice a another ownership, utilize the chown Linux command to alter the file’s ownership. This is the basic syntax for the command:
Chown [owner][:group][file name[file name]
For instance, if your username is Hostinger Use syntax such as this:
chown Hostinger filename.txt
If you aren’t at ease using SSH yourself, you can contact our support team to get help.
6. Verify the A Record
The 403 forbidden error could be triggered when your domain name is pointed to an incorrect IP address, indicating that you do not have the access to the contents. So, make sure that your domain name is pointed towards the proper IP.
To determine if the DNS zone A record is properly pointed to the correct domain, open to the Domain Zone Editor in your hPanel.
- Log into Your HPanel.
- Navigate through in the advancedsection and then click DNS Zone Editor.
- There is an alphabetical number of DNS records. Look for a record that has A as the type. “A in the column for type.
- Find the IP address in the Contentcolumn.
- If the IP address is pointing to an incorrect IP address then click Editto modify it. After you’ve completed the editing, select to update.
If you can’t locate the right record, you can create another one using the Manage DNS recordssection. Be sure to choose the letter Aas the name and then enter your correct IP address in the Points tofield. Then, click Add Record.
If you’ve recently switched from one host to another, but did not alter your nameservers your domain could remain linking to your previous web hosting service. When the old host terminates your account, it’ll result in a 403 error code.
7. Scan for Malware
Malware is a possible reason for this error. If your WordPress site is infected by malware, the site will continue to inject malicious information into the .htaccess file. So even if you continue making changes to the file by using the method we first described however, the problem will continue to persist.
Check your website for any malware. There are a variety of security plugins available for WordPress like Sucuri as well as Wordfence for you to perform this.
The majority of WordPress security plugins such as WordFence are able to eliminate malware. After the plugin has identified the infected files, you’ll be given an actionable option for these files, like the deletion or restoration of them.
Another option is recovering the site by using backup files. You can also restore it by using the database backup in the event that you don’t have a full backup of the site’s files.
8. Clear Your Web History/Cache
The cache and cookies in your browser could also trigger the 403 error. Cache stores information to help your website load quicker every time you revisit it. It’s possible, however, that the URL of the website has been modified and the actual page’s URL is different to the one in the cached.
The other possibility could be that this error stems from cookies. This could be the case for a website where typically logs you in however the most recent login attempt displayed the error message.
Clearing the cache in your browser and cookies will resolve the problem. Be aware clearing the cache can make the next time you visit the site to take a lengthy time because your browser will be requesting all of the site’s files. Clearing the cache also locks you off of all registered websites.
Take these steps in order to clean all cookies and cache off of the Google Chrome:
- Click on the three dots icon at the top right hand corner and choose Settings..
- Look for the Security and privacysection Click to clear the browsing history.
- Select the drop-down menu and choose the date and time to delete data. After that, you can check for Cookies and any other information on the siteand cached images and file options.
- Click Clear data.
After you’ve completed the steps, check back on the site and logging in if it asks you to do this. If this or other options don’t work, then we suggest contacting us through the live chat to solve the problem.
Troubleshooting Other 4xx Errors

Conclusion
Error 403 that is forbidden can trigger many frustrations since they prevent users from accessing resources.
They usually occur because of improper permissions for files, however there are a variety of different causes that could cause them, including the absence of an index file and plugins that are not functioning properly or even a malware-related infection.
Locating the root cause of the errors 403 can be difficult. But, if you follow the guidelines within this post, we’re confident you’ll be able to get your website functioning again.
In case you’re wondering, here’s the steps you must follow to remove the error code 403 on your WordPress website:
- Examine for the .htaccess file.
- Reset the permissions of directories and files.
- Delete WordPress plugins.
- Make an index file.
- Edit ownership of files.
- Check the Record.
- Get rid of any malware.
- Clear the history of the browser on the internet and cache.
The forbidden error code 403 is one of numerous HTTP code errors. If you are a webmaster you might have come across other errors that are client-side, like the 404 error as well as server-side errors such as the gateway timeout 504.