
What is the MoUSO Core Worker Process?
The MoUSO Core Worker Process is like a manager for updates on your computer. It decides which updates should go first and which ones can come later.
It also manages the session for updating and fixes issues that could stop Windows from updating.
It also protects Windows against potential security risks while updating.
MoUsoCoreWorker.exe was replaced by wuauclt.exe (Windows Update AutoUpdate Client) within Windows 10 (Version 1903) from September of 2020.
Based on the power configuration the file will be displayed in either MoUsoCoreWorker.exe as well as USOCoreWorker.exe.
It’s worth noting that after Microsoft replaced wuauclt.exe, some antivirus programs started flagging MoUsoCoreWorker.exe as potentially harmful malware. However, this isn’t the case.
MoUsoCoreWorker.exe is a part of the Windows 10 and 11 versions. Windows 10 and Windows 11.
What Causes MoUSO Core Worker Process High Memory/Disk/CPU Usage?
The For MoUSO Core Worker is configured to operate in the background, which doesn’t interfere with any other process that the user runs.
It typically consumes approximately 8-9MB of memory. However, The MoUSO Core Worker Process can often consume a lot of your computer’s memory because it deals with installation and download issues that frequently happen during Windows updates.
Sometimes the process can cause excessive CPU and disk usage.
Our research has revealed that the MoUSO Core Worker can lead to high memory, CPU, or disk usage due to the issues listed below.
- MoUsoCoreWorker.exe procedure is in the process of being outdated. The process may be out of date, however, applying the most recent Windows updates will fix the issue.
- The Pending updates are blocked.
- It appears that the Windows update is not in the correct condition.
Does MoUSO’s Core Worker Process is it Malware?
No, it’s safe. This MoUSO Core Worker Process is a Microsoft-made application that’s included in Windows after it is installed in your system.
The process isn’t able to damage your device in any significant method, and you won’t have to be concerned about getting rid of it.
However, due to the possible increase in the use of the CPU or disk, this could result in negative effects if you allow it to run aground for a prolonged duration.
Certain users have stated that the process could harm the SSD drive.
What Can I Do to Fix It? MoUSO Core Worker Process’s High CPU and Disk Usage
There are a few options to take if your MoUSO Core Workers Process has been consuming the resources of your system. While the actual process cannot be eliminated, it is possible to solve some problems that could make it use too much of your computer’s CPU, disk, or memory.
Method 1. Install All Pending Updates
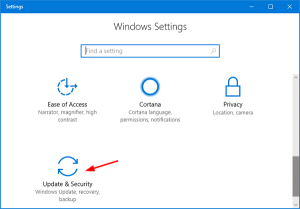
- Click the Windows icon at the lower left corner of the screen. It will open to your Start menu. Select the Settings option either by clicking to use the Windows + I shortcut.

- Select the Update and Click on the Update & tile. Here you will access the majority of the Windows Update settings and choose which updates to get.
- You must ensure that you are at the standard Windows update tab. Choose the “Check for updates” option and then allow Windows to display updates available. If updates are listed, you can click the View All Updates Optional link for them to download and view them.
- If Windows discovers that it has a new version and you click the install option. Then wait to allow Windows to complete downloading and then apply all updates that are required.

Method 2. Run the Windows Update Troubleshooter
You can attempt to resolve MoUSO Core Worker Process problems by using the Windows Update troubleshooter. Here’s how:
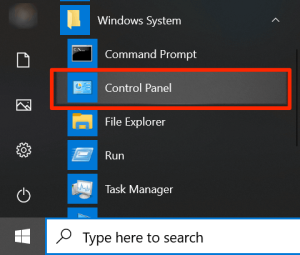
- Open the search bar on your taskbar by clicking the magnifying glass icon. It can be brought up using it using the Windows + S keyboard shortcut.

- Enter Control Panel into the search bar. Once you have it listed within the search results, just click it to start the program.
- Look up Troubleshooting by using the input box located on the right-hand side after which click the Troubleshooting head of the results.

- Select the View All link on the left side of the pane. It will take you to a different page that has every troubleshooter available listed.
- Find and locate the Windows Update troubleshooter. Simply click on it and then allow the troubleshooter’s launch to appear on a separate screen.
- Go to next to start to begin Windows Update problem analysis. If the troubleshooter manages to determine the cause of any issue the program will attempt to solve the problem. It will provide a complete analysis at the conclusion of the troubleshooting phase.
How to Clear Cache With Chrome //Net-Internals/#DNS on Windows, MAC : SOLVED
How to Clear Cache With Chrome //Net-Internals/#DNS on Windows, MAC : SOLVED
Method 3. Disable Delivery Optimization
- Use the Windows + R keys on your keyboard simultaneously to launch the Run program. Input ” regedit” without quotation marks after which press the OK button.
- Make use of the navigation pane that is located on the left-hand side of the window to access the registry key you want to access or the address bar to copy and paste the key’s address:
HKEY_LOCAL_MACHINESYSTEMCurrentControlSetServicesDoSvc - Right-click the Start value, then select to modify… from the contextual menu. The new window will pop in the middle.
- The Value data field must be changed by changing the value from current to 4, Check that the Base setting is adjusted to Hexadecimal Then, hit OK. “OK” button.
- Now it is time to restart your PC before you move on to the next step. When your system is successfully rebooted, you can continue the next steps.
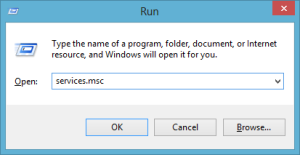
- Use the Windows + R keys on your keyboard simultaneously to launch the Run program. Enter ” services. Msc” without quotation marks after which press the OK button. The Services will be launched the Services in a new window.
- Scroll until you find delivery optimization on the list of available services. Click on it and choose properties from the contextual menu.
- Verify you’ve got you are sure that the Startup kind is selected to disabled. If not, you can change it by selecting the drop-down menu and then choosing it.
- Click OK. Then you should be able to determine if you can determine if the core MoUSO Worker Process is still causing an excessive amount of CPU, disk, or memory use after you have made this change.
Method 4. Restart Windows Update Service
If your Windows system isn’t going to sleep after you’ve confirmed the reason as it’s the MoUSO Core Worker process, restarting your Windows Update service is likely to fix the issue.
- Click the Windows + R keys on your keyboard simultaneously to open the Run application.
- Enter ” services.msc” with no quotation marks after which press the OK button. The Services will be launched the Services in a new window.
- Scroll until you find Windows Update within the list of available services. Select it with a right-click, then choose Refresh in the contextual menu.
Method 5. Reset Windows to its Default Settings for Power
There is a chance there is a chance that MoUSO Core Worker Process is making your computer get up in sleep mode an ongoing routine. For this issue to be resolved, return your power settings to the default setting.
- Click the Windows + S keys on your keyboard to launch the search engine either by clicking upon the magnifying glasses icon on the taskbar of your computer.
- Within the search bar, you can type in ” PowerShell” and click the right-click icon within the search results. Then click to run the application as an administrator within the contextual menu. If you’re running local accounts that don’t have administrator privileges.
- If you are prompted by User Account Control (UAC) then click “Yes” to let the app to start with admin permissions.
- Type in the following command, and then hit the Enter key on your keyboard to execute it: powercfg -restoredefaultschemes
- The command will take a while to complete its work. Then, you can restart your system to check if this fix is working.
https://ustechportal.com/cool-ironman-wallpapers/
Conculsion
It’s crucial to know what the MoUSO Core Worker Process actually is and how it operates to ensure a stable system.
This article offers suggestions to solve problems that arise with your computer’s processor or memory is straining due to the background work.
If you’re in search of solutions or assistance, do not hesitate to reach us. We’re here to assist you! Stay current with the latest technology news when you’re at our website. Keep checking us regularly for tips on how solve issues and follow our social media pages.
FAQs
What Exactly is The MoUSO core Worker Process?
It is the MoUSO Core Worker process is an element that is part of the Update Session Operator (USO) that is responsible for managing the installation update software.
Why is the MoUSO Core Worker Process Essential?
This ensures that updates are implemented in order and efficiently improving the security of the system and operational efficiency.
How do I Turn off MoUSO’s Core Worker Process?
Although it is possible to alter the settings for updates, deactivating this option is usually not advised due to security concerns.
What is the Core Worker Process of MoUSO Prioritize the Release of Updates?
It will prioritize updates based on factors such as security, importance, and compatibility with the system.
Is the MoUSO Kern Worker Process Identical for Every Operating System?
The system may show slight variances depending on the system operating.