
You have chosen a Roomba vacuum model 600 or 700 for its automated features and it is now giving you an error 14 code.
A Roomba error code is a sign that your vacuum has a problem. But what is the Roomba error 14, and how can you fix it? An error code will be displayed on your Roomba vacuum if it isn’t working at its best.
Roomba error 14 refers to the operation of the vacuum’s bin section. This easy-to-follow guide will help you to fix the Roomba’s bin area and any other issues that could be causing this error code. Your Roomba can then clean your floors again.
What Does it Simply When Roomba Shows Error 14?
Your Roomba will display “Error 14” if it isn’t detecting a bin. The sensors, bins, and filters may have become too dirty to function properly. Your Roomba’s software could also be corrupted. The dustbin is not securely placed or has damage. Oder the battery is low.
Roomba Error 14 – 5 Causes and Ways to Fix It
1) Sensors, Filters, And Bins are Dirty
Don’t neglect your Roomba. It does all the hard work for you. Get on the ground. Get rid of all the dirt, dust, and grime.
It can reach the most difficult areas in your home. It can get filthy as a result.
The sensitive parts of the Roomba are delicate. It is equipped with sensors, filters, as well as a bin.
There Are Three Types of Sensors in Your Roomba:
- Cliff sensors
- Full-body bin sensors.
- Sensors for floor tracking
Cliff sensors detect any changes in floor level. Stairways, steps and ledges are all examples. It allows the Roomba to swerve and stop.
Full bin sensors notify you when your bin is dirty. Floor tracking sensors collect data about the room. This includes the location of furniture and walls.
The full bin sensors are important for Error 14. These sensors can detect an installed bin. These don’t work well if they get dirty. The Roomba is unable to detect the contents of the bin.
The filter is another thing to inspect. The filter separates the dust into smaller particles. The smaller particles are then put into the bin.
There may be some dust, wool or larger objects that accumulate. They can then get on other parts of your device.
This bin captures everything that passes through the filter. This is the most soiled part of your Roomba.
“So How Often Should I Clean My Sensors, Filters and Bin?”
Once a month for the floor tracking sensors or cliff sensors. It is required for full bin sensors every two weeks.
Keep the Roomba on a daily basis. Once a week, clean the filter You should clean the filter twice per week if you have pets with hairy heads. You should also change the filter every two months.
Empty the bin after cleaning. It would be a good idea to clean it as well.
“What is the Best Way to Clean these Parts?”
You can view the sensor’s appearance before you start:
Step 1: Have a microfiber cloth on your hand. It should be clean.
Step 2: Flip over the Roomba. Find the sensors. Each model may differ. You will find some sensors under the device. Check the manual of your Roomba.
Step 3: Gently wipe the sensors using the cloth.
Step 4: Now, you need to take apart the bin unit. You will need to remove the bin and filter. Clean the fan before you do this. This can be done with a Q-tip. This is to reach smaller corners. This area will also be covered with dust.
Step 5: To clean the filter, click on the release button. It is located on the top of your Roomba. Then, slide the bin out. Next, empty the bin. To open the bin, press the yellow lever.
Step 6: The filter is often colored blue. The tabs should be pushed to one side. Next, take the filter out.
Step 7: Tip the filter into your garbage can. Continue doing this until you are satisfied with the result. Slide it back once you are done.
You can also use a paper towel to remove the dust. You can also use a vacuum cleaner. Never wash your filter with water. Once you have done that, slide it back.
The bin can be washed with water. Use warm water to rinse it. Be sure to clean the sides.
After everything has been rearranged, you can check to see if error 14 still persists.
The Firmware Has been Corrupted
Software bugs are the biggest enemy of any device.
Software is also used by your Roomba. Sometimes, the latter can fail. It can be especially frustrating if you have used it for so many years. However, it’s not always necessary.
It may be in need of a break. Or a deload. Start over with a clean slate.
The software will slow down and cause problems for other components. The error will then appear.
There are Three Ways to Resolve this Problem:
- Reset the device.
- Restart the device.
- Reinstall the battery.
How can I Restart My Roomba?
It all depends on the model that you have.
- Press the Clean button for the I Series Roomba and S Series Roomba. For 20 seconds, hold it. The white light will begin to spin counterclockwise around the button. Once this happens, release your button. Wait for the Roomba to turn on its white light. It takes only a few seconds.
- Press the Clean button for the 700, 800, or 900 Series Roomba. It should be held for 10 seconds. When it beeps, release the button. Your Roomba will then reboot.
Didn’t work? Next, move on to the next step.
How Can I Reset My Roomba?
It may be possible to reset the factory. As if you were studying for weeks. Finally, take the final exam. It’s important to get your head clear as soon as possible.
- This is how your Roomba feels.
- All Custom settings, maps, schedules, and schedules are deleted when you reset. Before you do this, make sure to take a note of all data. Make sure your Roomba has an active connection to the iRobotHome app.
- Open the iRobot Home App to reset. Navigate to Settings. Choose Factory Reset. Accept the prompt. Wait for the prompt to complete resettings.
- If that fails, you can open the app again. Deactivate Edge Clean Mode. This mode instructs your Roomba that it should focus on the edges of a space. This setting can be found in Cleaning Preferences.
How Can I Reinstall My Battery?
No improvements? Let’s make some improvements to the battery.
- To replace the battery:
- Use the Home Base.
- You will need only a power source.
- Your Roomba will return to its Home Base after cleaning. It will also return to the Home Base if its battery is low.
- Your Roomba can be charged by plugging into a wall socket.
Be Aware: Don’t wait days to charge your Roomba. This could cause damage to the battery.
It’s charging when it has an amber-red pulse light. It’s full when it flashes a solid green light.
A 16-hour refresh fee is also charged. This applies to Roombas who have been away from their Home Base for a prolonged period.
This is done by the Roomba on its own. It recharges the battery. It also prolongs the battery’s life.
The battery can last up to 2 hours.
Can You Change the Battery in My Roomba?
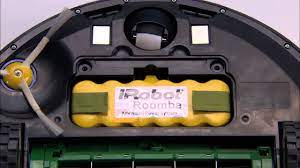
The battery of a Roomba can be changed. It does not require technical knowledge to get it out.
Remember that a Roomba can live for 2-6 years. However, a battery’s lifespan is dependent on how well it is cared for.
If your battery is old, you should get a new one.
Doesn’t charge.
Rapidly drains in less that two hours
It is almost at the maximum age of 6 year for the device.
It is best to buy it from a trusted manufacturer. Make sure that it is the exact same battery as before.