
ERROR SOLVE: The Tag Present in the Reparse Point Buffer is Invalid: OneDrive is Microsoft’s cloud-based service for storage which lets users store documents online, synchronize data across their devices, and connect with friends at any time.
Through integration With Windows File Explorer, it provides seamless access to files and control. Like all software there are difficulties. The most common error users face could be “The tag present in the reparse point buffer is invalid.”
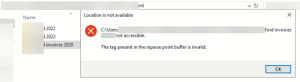
The error usually occurs when people attempt to change the setting of folders or file deletion copy the files or various other tasks. The error message will usually include more information within the error message.
This could be a code of error such as 80071129 or a “Location not found” message. This problem, although not common is due to a glitch in OneDrive sync. OneDrive sync.
Although it’s not as easy as it might appear, “The tag present in the reparse point buffer is invalid” issue can be fixed, and the methods differ for each one. One solution that’s proven to be effective for the majority of users is to run a Check Disk command using Command Prompt.
This involves testing the quality of the file system as well as correcting logical errors in the file system. But, in certain situations, it is necessary for the system to be put in safe Mode and then the Check Disk procedure is repeated in order to resolve the problem completely.
Beyond the Check Disk command, there are a variety of other options that could be useful in trying to repair the “The Tag Present in the Reparse Point Buffer is Invalid” error.
Restoring damaged Windows files is a common technique. This can be accomplished by using this System File Checker tool, that scans and repairs damaged Windows System files.
If the issue persists, reset or restarting OneDrive will help to solve the issue. It involves removing OneDrive from your PC before reinstalling it in order in order to create a new clean slate.
What Can Cause The Tag Present in the Reparse Point Buffer is Invalid on Windows?
This problem is due to the issue of files and folders which are synced to OneDrive.
The error message “The tag within the reparse point buffer is not valid’ usually appears when there are problems with the reparse point that includes metadata for the directory or file.
If the metadata is damaged or has invalid information, Windows will display the subsequent error. Three different types of errors are present in the pop-up
- “Location is Not Available”, “File is Not Accessible” Then “The Tag Present in the Reparse Point Buffer is Invalid”
Whatever the cause of this issue it is the same. The root cause and fix are nearly identical and can be applied if having this issue.
Let’s begin to solve this issue!
What Can I Do to Fix This Problem?
There are three possible solutions to the issue you are facing. You can test and determine if these solutions resolve the issue you’re experiencing. They are listed below with specific steps along with explanations.
- Install the most current Windows Update: Many users have reported this issue began appearing after a particular Windows update. It is possible that updating Windows to the most recent version will fix the problem since Microsoft has made available a variety of hotfixes for this issue.
- Set The OneDrive cache directory: If your OneDrive’s cache is corrupted, or has become outdated it could cause this problem. The OneDrive cache may contain vital details about the directory or file that is stored within OneDrive. The clearing of the cache can make OneDrive start a fresh cache entirely, thereby fixing the issue.
- Run CHKDSK Scan A CHKDSK Scan will scan and fix any error in the file system, or sectors that are damaged in your drive. Repair points are part that is part of the NTFS file system. The CHKDSK scan could help solve the problem.
1. Install the Most Recent Windows Updates
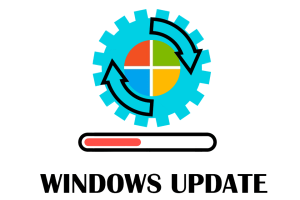
Before moving on to the next fix in the following list, you must begin by installing any updates that are still in the process of being up and running.
The main reason for this is that Microsoft has released hundreds of hotfixes that aim to improve the performance of OneDrive integration for both Windows 10 and Windows 11.
To ensure that you’re getting the most benefit from every update made by Microsoft you must access Windows Update.
Access the Windows Update component and install any update you’re waiting for, regardless of whether you’re running Windows 10 or Windows 11.
Please follow the below instructions to get step-by-step instructions about how you can do this:
- Start the run dialog box using the Windows keys + R.
- Type ‘Ms-settings: Windows update inside the text box and press Enter
Open up the Windows Update tab - When you’re being asked via the user Account Control (UAC), choose “Yes” to allow administrator access.
- Press on the “Check for updates” button.
Check for updates on Windows 10 and Windows 11 - Follow the prompts on the screen to install each pending update on your system.
Note: If there are a number of uninstalled updates that are waiting to install, you may be asked to reboot your computer before having the opportunity to install all the updates – if it happens, restart your computer following the steps and come back to the screen you were on when your next restart is finished.
- After every update that is pending is installed, go back to Onedrive and recreate the situation that previously caused this “tag present in the reparse point buffer is invalid” error. Then, check whether the issue is solved.
If this OneDrive problem persists then move to the fix that is next listed below.
2. Set your OneDrive Cache Folder
Many affected users with similar issues are confirming that they have been able to resolve the issue after resetting the entire OneDrive cache, while logged into the account as an administrator.
Follow the below steps to reset the whole OneDrive cache by using higher-level Command Prompt:
- Click the Windows keys plus R to launch the Start dialog box.
- Type ‘cmd’ and press Ctrl + Shift + Enter to launch to open a Command Prompt window with admin access.
Open up an elevated CMD prompt - If you’re asked to do so by a user account control window, select “Yes!” to allow administrator access.
- After you’ve entered the elevated Command Prompt Type the command below to start a reset procedure for OneDrive’s cache: Type the following command to reset OneDrive cache:
%localappdata%\Microsoft\OneDrive\onedrive.exe /reset - Once the process is completed reboot your system, after which you can repeat the procedure that resulted in a “tag present in the reparse point buffer is invalid” error. Check what happens. resolved.
If you find that cleaning OneDrive the cache wasn’t doing any good then move on to the second possible solution in the next section.
3. Run a CHKDSK Scan
In the event that none of these suggestions mentioned above worked on your behalf, then it’s likely that you’re experiencing an issue caused by a corruption of the system files that impact the files used to join the OneDrive On-Demand feature.
If you’re in a situation similar to this scenario, the most effective method of action is to perform a CHKDSK scan using the command prompt elevated to repair the damaged OneDrive junction dependencies by healthy alternatives.
Important before beginning to use this method It is crucial to realize the fact that performing this kind of repair may require restarting your system at the completion of the process. Prior to proceeding, make certain that you save any file that you’re in the process of working on.
When you’re prepared to launch the CHKDSK scan Follow the instructions on the screen below to set up the CHKDSK scan:
- Use the Windows keys and R to bring up the Start Dialog box.
- Type ‘cmd’, and Press Ctrl + Shift + Enter to open un an elevated Command Prompt.
Open up an elevated CMD prompt - If you’re being asked to do so by the User Control of Account window, you must click “Yes” to give administrative rights.
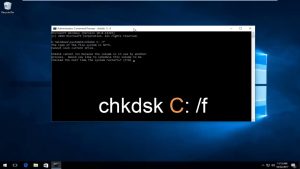
- When you’re at an elevated prompt enter the command below and then press Enter to begin the cleanup of a dependency file by using the Check Disk Utility :
chkdsk c: /f - Then, you’ll be asked to confirm your procedure. You can do this by entering the letters “Y” after which you enter the Enter key.
- Then wait until the procedure has been completed. Then restart your system and verify whether it is able to resolve the “tag present in the reparse point buffer is invalid” error has been corrected.
Bottom Line
What do I do you resolve “Error 0x80071128: The data present in the reparse point buffer is invalid”? You may think that you already know the solution. If you know of alternative solutions to this error then please tell us by leaving a comment in the next area.