
How to Get Synthetics Monitoring to Work in New Relic: We know that New Relic is currently an extremely discussed online solution to manage websites. This is the reason this blog post was intended to guide you through the monitoring of synthetics and other important data that you need to be aware of in order for your website in order to make them run efficiently.
Before diving into the issue of getting the synthetic monitoring system to function within a brand-new relic it is first necessary to review the following ideas:
What is New Relic?

New Relic APM, is a cloud-based app for performance management (APM) software that can help to monitor the app’s performance, monitor their health and prioritize the changes they make.
The system monitors for any abnormalities in the performance of your application. Synthetics is an internal service that we offer our clients.
New Relic APM analyses these incidents and evaluates the state of your app by analyzing the frequency and intensity of these incidents.
What is Synthetic Monitoring?
Synthetic monitoring is the method of forecasting when a computer process or system will be ineffective or over-promised. This is a means of using centralized systems to track performance via simple events such as JVM shutdowns or application errors.
Synthetics looks for any anomalies that may affect the performance of your application by sending periodic information to our servers and then analyzing the data against previous patterns.
Alerts are programmed to will notify you when anything unusual occurs, for example, the usage of memory increases or sudden increases in response times for users who access specific pages in the app (such as the login webpages).
How Can I Enable Synthetics Monitoring to Function in New Relic?
Create Synthetic Monitors Without installing
For the first step to begin, you must follow these steps:
- Create a New Relic account.
- Go to one.newrelic.com > Synthetic Monitoring > Create monitoring.
- Pick the type of Monitor you want to Create. If you’re new to this process, we would suggest beginning by creating a ping or a step monitor.
Take the steps below for getting started with synthesized monitoring. This will work with New Relic:
How to Edit the Synthetics Monitoring to Work in New Relic
These steps will lead you through the process of every monitor we have.
If you are looking to create more than one monitor at the same time You should take a look at the NerdGraph API synthetic monitoring tutorial. It lets you create monitors on the fly through API calls.
Monitors can be created with our multi-channel synthetic monitor REST API. To use REST APIs, it is necessary to send a GET request to find information about the settings of the monitor you want to use.
When you’ve got the information you can use POST to make an exact duplicate of the screen you have selected.
Edit a Monitor
Note that after you have created an account, you are unable to modify its design. You do can edit any other settings for your monitor.
- Visit one.newrelic.com > Synthetic Monitoring and choose the monitor you’d like to change.
- From the menu on the left in the side menu, click on the link for modifying the settings in this manner:
- Select Settings > General to modify the URL, name and locations. You can also change the frequency as well as advanced settings.
- To use Scripted browsers and API test monitors, go to Settings > Script, then Edit the script for your monitor.
- To control alerts from synthetic monitoring to manage alerts for synthetic monitoring, select Manage Alerts.
- After you’ve made all necessary adjustments Make sure to save the changes and Confirm.
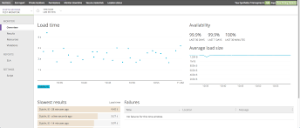
Summary Page:
To check the status of your Synthetic monitor you need to click on its name on the upper right corner of the page summary.
If an active event has caused an alert, you can select “critical alert” for the selected monitor “critical alert” for this chosen monitor to open the alert in a separate tab.
Alert policies can be accessed via “manage policies for all monitors”.
Monitor Generated Results:
One way to gauge how web applications perform is by looking at the result page. It is possible to sort the results to help you identify trouble areas or unexpected results.
Filter by location in order for comparing monitor performance across different places. (The “Network timings” graph below shows a summary of the performance of a website over an extended period of time.) For this, you’ll need to:
- Navigate to the newest relic then go to Synthetics.
- On the tab for Monitors Select your preferred Monitor.
- Click Monitor, then Results.
Understanding Resource Load-time
The outputs from the synthetic resource page will offer the full report on the ways that each element of your website can have an effect on the general load. These include your pictures, HTML, CSS, JavaScript as well as other components.
It is possible to drill down into the detailed performance metrics that are collected at run time and find performance data on time used by third-party resources, and find HTTP response codes for every resource. In order to do this, you’ll need to:
- Navigate to the new Relic Then go to Synthetics.
- From the Monitors dropdown menu, choose your preferred monitor.
- Click Monitor, then Resources.
How to Delete Synthetics Monitor

Deleting a Monitor
In order to delete a monitor, follow these steps:
- Make sure you have Admin privileges.
- Go to one.newrelic.com >> Synthetic monitoring and select the monitor you wish to delete.
- Click on “General”, and then locate and click the “delete monitor” button.
Review The Performance of Your Application
- To make sure that the web-based services function exactly as you expect, and without error, It is essential to have accessibility to the outcomes of your app’s performance. Synthetic monitoring offers this type of security by running automatic tests of your web application in each of the locations you select. Synthetic monitors can record occasions of downtime (called “violations”) and take the aggregated number along with the results as well as detailed information for every page resource.
- In order to quickly identify failed monitors, check to check the list of monitors that are synthetic page to find out what monitors are subject to open violations, their success rate over a period of 24 hours, the failure locations in the number as well as the duration of the monitor and the type of monitor.
- When you click on a monitor you’ll be directed to the Summary page on which you’ll be provided with details on which monitors are in the process of failing, as well as why it’s not working (last error message or error response code and duration by domain) along with other details for you to gain more insight into the app’s performance in the course of time.

