How to Fix Video Scheduler Internal Error : Full Guide

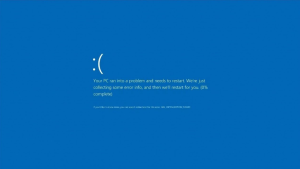
The VIDEO_SCHEDULER_INTERNAL_ERROR occurs if you have recently installed new hardware or software which causes conflict between the video drivers and Windows 10.
The program will display a Blue Screen of Death (BSOD), which means that it has detected that there is an insignificant violation.
This problem can be caused by a problem with the Graphics device or a driver-related issue and is marked with the stop error code (0x00000119).
When you see the VIDEO_SCHEDULER_INTERNAL_ERROR the PC will usually restart and before this error occurs your PC will most likely freeze for a few minutes.
Many users are frustrated that the Display crashes occasionally. But before moving forward to the solution to this problem, we must completely understand what is causing this VIDEO_SCHEDULER_INTERNAL_ERROR and then ready to fix this error.
There are many reasons why Video Scheduler Internal Errors occur:
- Incompatible, corrupted or obsolete Graphics driver software is corrupted or incompatible with other graphics drivers.
- Corrupt Windows Registry
- Malware and virus infection
- Windows system files are corrupted Windows file system files
- Hardware problems
This error can occur at any time while you are working on an important project or watching a movie. However, it is impossible to save any work on your computer. You will then be faced with BSOD errors and have to restart your computer. Let’s not waste your time, let’s examine the troubleshooting steps.
How can I fix the Video Scheduler Internal Error in Windows 10 and 11?
Run a Full System Scan
- Open the Start menu and type “defender” in the search box. Select Windows Defender among the available options.
- Select from the left-hand panel in Windows Defender program. This option is Virus and Threat Prevention. Click the Scan option.
- Click on the option to perform a Full Scan, and then click To Start.
Malware infection or viruses could cause an internal error in Video Scheduler. These bugs could cause many issues, including the Scheduler Internal Error.
You can either use the built-in antivirus to fix it or, if preferred, you could use third-party antivirus software .
Restore Your Installation
- Use Windows key + X Select Windows PowerShell (Admin).
- Enter the following information into your computer, then hit Enter. : sfc/scannow
- Let the scanning process finish, then reboot your computer to restore any damaged files.
If you are still having trouble with your problem, we recommend using a BSOD repair program such as Restoro to fix it.
For your video, update the driver
- Click on the Windows key + R To begin the Run window.
- Enter devmgmt.msc in the Run window and click OK.
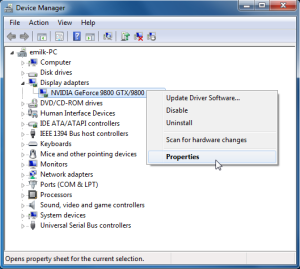
- Locate your graphic card. Right-click the card and choose Upgrade driver.
- Select Automatically search for Drivers, and then wait for it to finish.
Repair Your Registry
There may be several Windows stop codes that can arise from corruptions in your registry or other registry entries. One of these is an error in Windows’ internal video scheduler. The built-in System File Checker of Windows (SFC), is a great tool to find and fix problems.
These steps will help you get the method working.
-
- The following keys can be pressed simultaneously on your keyboard: “Windows” & “X”. Choose “Command Prompt(Admin)” from the menu.
- These commands must be entered into the field to start SFC. Then, hit “Enter”
SFC scannow
sfc = /offender = c Windows
- Once the process is finished, restart your computer.
Uninstall Graphics card Driver
This error could be caused by a malfunctioning driver on your graphics card. It is therefore necessary to delete it. After you have completed the above, you can install your driver again without any problems. These steps will help you to do this:
-
- Navigate to Device Manager on the Control Panel shortcut menu.
-
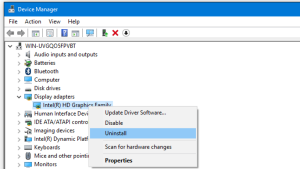
- Right-click on the driver for your graphics card and choose “Uninstall”.
- To confirm your selection, click “Yes”.
-
- Start “Control Panel” by pressing “Windows” or “X” keys on the keyboard.
-
- Click here to go to the “Uninstall A Program” tab
-
- Select “uninstall all related to Nvidia”, Nvidia is the driver for your graphics card.
- To save your changes, restart your computer. Download the latest driver from your manufacturer and set it up.
Update Graphic Card Drivers
Did you know that an obsolete graphics card driver can cause errors in the video scheduler program? These instructions will help you update your graphics card drivers if that is the cause of your problem.
-
- “Run” can be opened. The shortcut keys “Win” + the “R” keys will open the “Run dialog box. Once you are there, follow these instructions: devmgmt.msc
-
- Expand the “Display adapters” selection to select the driver for your graphics cards. Right-click the card and select “Enable”.
-
- Right-click the graphics card and choose “Update Driver Software”.
-
- Select the option that allows for automatic searching of the most recent version of the driver program. The issue will likely be solved once the process has been completed.
-
- If the first option doesn’t work, click on the “Update Driver Software” button. This will allow you to search your computer for the latest driver software
-
- Select “Let’s choose from a list device drivers on my system” to then select the driver compatible with your graphics cards. Select “Next.
- After the process is completed, save your changes and restart your computer.
Computer Must Be Reset
Try resetting your computer if none of these options work. If you try this, it could cause permanent data loss. It is recommended to delete all data from your computer and then restore it to its original configuration. You can always restore data from backups. To retrieve deleted or lost data from your computer, use a data recovery program.
Once you have recovered your data, follow these steps:
- Select Update and Security from Windows + I. Choose Recovery.
- Click Start, which is located in “Reset this PC”.
- Next, decide to delete everything to make this process a success.
- After that, click Now remove all files from and then click Next.
- A message alerting you to the possibility of your personal data being deleted will likely be displayed.
- Next, select and then Reset. continue if you are prompted.
- Let the process finish. Then, restart your computer.
Fix BSOD Errors Like A Pro!
The screen of Windows 10 displays a blue screen due to Video Scheduler internal errors. This could occur in any situation, and for any reason.
This blog will help you find the best ways to fix a BSOD error.
These methods can be done by anyone, so you don’t have to follow any instructions.
You can still try some of the methods, such as performing CHKDSK or resetting your PC, but you may lose data.
It doesn’t matter if you have a backup or reliable data recovery software in these situations.
