[FIXED] How to Fix Generic PnP Monitor Problem on Windows 10: Simple Steps
![[FIXED] How to Fix Generic PnP Monitor Problem on Windows 10: Simple Steps](https://ustechportal.com/wp-content/uploads/2021/09/How-to-Fix-Generic-PnP-Monitor-Problem-on-Windows-10.jpg)
Do you see the error “failed to install hardware monitor driver” when connecting an external monitor?
Is your computer having trouble recognizing an external monitor? You could have a problem with the Generic PnP monitor driver.
Continue reading to find out the causes and solutions for Generic PnP Monitor error in Windows 10.
What is a Generic Monitor for PnP?
PnP is an acronym for plug and play. The generic PnP monitor drivers act as a translator between Windows and Plug and Play monitors.
The generic PnP monitoring is usually pre-installed on the computer that is first used. Sometimes, however, the monitor might stop working after an upgrade or after installing Windows updates.
What should you do if your monitor suddenly stops working?
To resolve the issue, it is best to download and install the generic monitor drivers.
How can I Fix my Generic PnP Monitoring Problem?
This issue can occur for many reasons. The most common causes are corrupted drivers, poor connection, and faulty hardware. Let’s now see how to fix the Generic PnP Monitor driver problem on Windows 11/10.
- Verify your cable connections
- Update or Reinstall the Generic PnP Monitor Driver
- Troubleshoot Hardware and Devices
- Update Graphics Driver
- Remove it from your computer and scan for hardware changes
- Let’s talk more about them.
Uninstall Generic PnP Monitor Driver
The PNP driver can be uninstalled to resolve the issue. These are the steps to remove the driver.
- Use Windows + the X key
- Click on Device Management
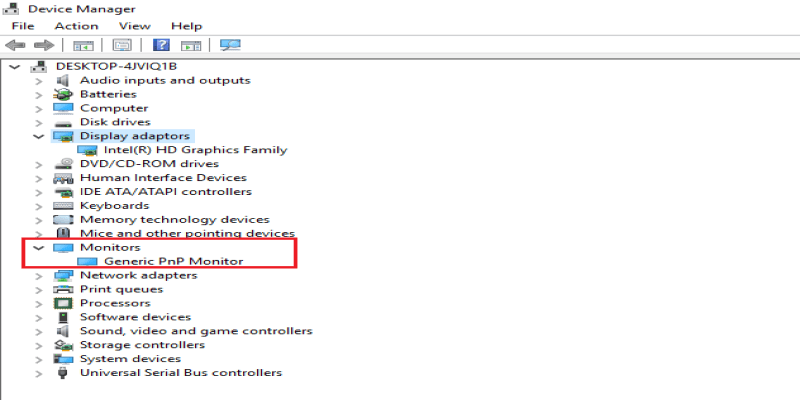
- Search for monitors in the Device Manager window and click on them to expand their category
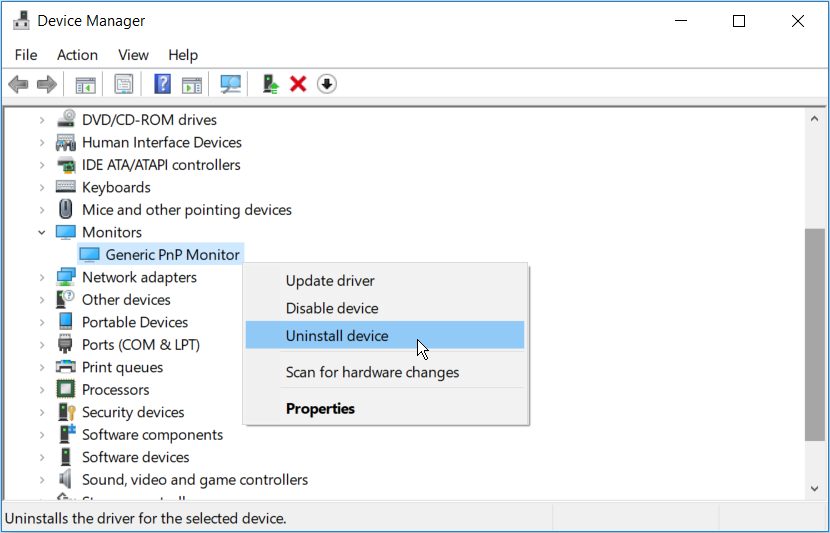
- Generic PNP Monitor will appear. Right-click it and click Uninstall Device.
- After you have uninstalled the device, click scan to make hardware changes.
Windows will search for and install the actual monitor. Not the generic PNP. This will fix the generic monitor PNP error Windows 10.
Update the Generic NPN Monitor
These issues can often be caused by outdated drivers. To fix the generic Windows 10 PnP monitor, you can update the drivers.
The driver can be updated manually or automatically. Here are the steps required to update drivers manually:
- Use Windows + the X key
- Select Device manager
- To expand the Monitor category, click on
- Right-click the generic PnP monitor to select the driver option
- Click on Search Automatically to Get the Latest Driver Software
- Windows will search for the most recent driver version and then install it.
- After selecting Update Driver, if you are unable to update the driver, then choose to Browse My Computer for Driver Software.
- Click on To see a list of device drivers for my computer.
- To see compatible devices, click on the Show compatible hardware boxAfter installing the driver, restart your computer. This will fix the generic Windows 10 PnP monitor.
Driver Easy is an automatic way to update drivers. You can also use this tool to fix driver-related problems.
Use Manual Method to Fix

Google for your monitor driver. You can also use the alternative method if you are unable to locate it.
- Go to device manager (Control Panel >> Systems). Right-click on your Generic non-PnP Monitor to choose Update Driver Software…
- Use Browse My Computer… >> Select from the list of device drivers available on my computer and then click Create Disk…
Navigate to the driver folder for your monitor. Once the system has removed the generic driver, your monitor should now display the native resolution.
Another Method:
Go to Device Manager (Control Panel >> System). Right-click on your Non-PnP generic monitor Choose and make your choice Uninstall…
Open up, go back to Desktop NVIDIA Control Panel.
You are good to go if Windows prompts you to install the driver. You can always go to Device Manager if it doesn’t.
Press F5 Click the right button to activate your Non-PnP generic monitor Choose your driver Update Driver Software >> Browse my computer for driver software >> Let me choose from a list of device drivers for my computer.
Uncheck Display Compatible Hardware.
The Right box contains (Standard monitor types Pick the one that best suits your monitor resolution. You should be able again to use your monitor at its full resolution after the installation.
The majority of the time, the problem can be solved by updating the NVIDIA driver and Windows updates. However, it happens sometimes. Another option is to try a different connection to your monitor.
Connect the Monitor to the Computer
Your system may not recognize the monitor if it shows up as the generic PnP Monitor. To fix the generic PnP monitor problem, you can reconnect the monitor and reboot the computer.
1. Turn off your computer and monitor.
2. Remove the power supply and monitor cable.
3. Reconnect the power supply to your monitor and the VGA/HDMI cable.
4. Reboot your computer.
After that, Windows 10 will detect the model of your monitor and then install the windows 10 drivers.
Driver for the Generic PNP Monitor can be Uninstalled
While some people might think there is only one generic PnP Monitor with no exclamation (someone reported seeing a PnP Monitor with a yellow triangle, or a generic Non-PnP Monitor with a yellow exclamation), others may not be aware that the monitor has a yellow exclamation. You can uninstall Generic Monitor if it is a driver error.
1. To uninstall the monitor, follow these steps: device manager > monitors > generic PNP monitor > uninstall
2. Click View To perform hardware changes, click
The yellow exclamation will then disappear, and your generic PNP monitor becomes the real thing.
Uninstall the Graphics Driver and Reinstall it
It is related to the graphics driver. You can uninstall the graphics driver to fix the problem.
You can remove the graphic driver via device manager and control panel, but not completely. So you can uninstall the entire graphic driver using Display Driver Uninstaller.
Next, visit the manufacturer’s website to download the latest video driver. Follow the instructions to install it step-by-step.
You can now reboot your computer and open the device manager to check if the generic display is still visible. If the answer is yes, you can try the next option.
Use the System File Checker
System file checker allows users to scan and restore corrupted files from the system files and conflict driver files. This tool can be used to detect corrupt files that may have been created by the monitor driver files.
1. Type Command prompt Enter the search term in the box. Click the right-click to select As administrator.
2. Type SFC/Scannow Press Enter .
Windows will then scan your computer and attempt to fix the problem.
Make sure Windows 10 is up-to-date
Windows 10 updates can fix many issues such as driver errors, system bugs, and hardware problems. To fix the PnP monitor error, you can update Windows 10.
1. You can find it here Start > Settings > Update and Security > Windows Update.
2. 2. Click Keep checking for new updates.
Windows will allow you to download new drivers and system files. You will need to verify that the monitor is back in the device manager. Here are four things you need to know about Windows 10 Update.
This will quickly and easily fix the Generic PnP Monitor problem. It should not be able to change your unrecognized monitor from the Generic PnP Monitor back to your real monitor.
Update the Graphic Driver
As you can see, if your monitor driver is not installed, the generic PnP Monitor will be displayed. Windows will be able to restore the original monitor by updating the Generic PnP Monitor Driver.
1. Open Device Manager.
2. 2. Expand the Monitors to find the Generic PN monitor.
3. Right-click the link to select Update driver.
4. Windows will then search for the Generic PnP driver and update it automatically. After that, the monitor’s real image will be restored.
If you’re using a desktop computer, the following steps can be used if you have trouble.
5. You can click Update driver to go to:
Search my computer for driver software Please let me choose from a list device drivers on my machine.
6. You can check the option Show compatible hardware. The result will show you the actual monitor. Select the monitor.
7. To update your graphic driver, use the Display Adapters Graphic Card > Update Driver.
8. The automatic way to assist you is if the device manager is unable to locate the driver for your monitor and install it.
Install the generic non-PNP Monitor Driver.
1. Navigate to Device Management.
2. Expand Monitors.
3. Click on Generic PNP monitor and choose Update driver
4. Click Browse my computer for drivers.
5. Select I’d like to choose from the available drivers for my computer.
6. Check and then select and install the compatible driver or the generic non-PNP monitor.
Use Another Video Cable
You can also connect your computer to your monitor using a different cable to fix the “Generic PNP Monitor” issue in Windows 10. This is how to do it:
* Please note: This method is only applicable to desktops or external monitors that are connected to your laptop.
1. Turn off your computer.
2. Replace the cable with a comparable one from a different manufacturer.
3. Power on your computer.
If you Like this information Please like and share the blog post on social media networks to spread the word about the solution.

![[100% Solution] How to Fix [Pii_email_029231e8462fca76041e] Error](https://ustechportal.com/wp-content/uploads/2021/06/stage-en-error-501-1024x575-1.jpg)


